
Tchiba Animator Java Application
Igor Tchibirev igor@tchiba.net
|
|
Tchiba Animator Java ApplicationIgor Tchibirev igor@tchiba.net |
Tchiba Animator is simple to install. Unzip file Tchiba11.zip into directory 'c:\Tchiba11' There have to be two files and one subdirectory:
Tchiba.jar - archive file with Tchiba Animator classesFor Windows 95/98/NT platform:
tchibaHelp.html - help file
DEMO - directory with examples
c:\jdk1.1.7\bin\jre -cp c:\Tchiba11\Tchiba.jar Tchiba
If a path to 'jre.exe' is included to PATH environment variable and
archive 'Tchiba.jar' to the list in your 'CLASSPATH' environment variable in 'autoexec.bat'.
The command for running the Animator has the form,
jre Tchiba
Please correct these command lines if you use not Windows platform and refer to the JDK1.1 documentation for your platform
how to set the 'CLASSPATH' environment variable.
In a nut shell data in Tchiba Animator represented as vector of vectors of vectors. This is the vector of key frames. Every key frame is the vector of shapes. Every shape is the vector of Bezier curve points. This model of data allows easy motion control at point level, and defines all possibilities and restrictions of Tchiba Animator.
|
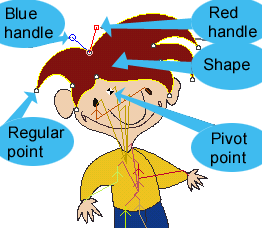
Drawing and editing the set of shapes used to design every character or an object of animation. Every shape has control parameters such as color and thickness of borderline. A shape can be filled, or bordered, or both. Every shape is represented as set of Bezier curves. Every point of a shape has two handles and can be manipulated in Bezier-style. Moreover, every shape has one extra point - a pivot point for manipulations with the whole shape. Basic linear transformations (scale, rotation, stretch, skew) as well as nonlinear transformation in "rubber" mode is provided by controls (handles) of a pivot. |
Like for a real puppet - an arm is attached to a hand, the hand - to a body etc., shapes can be attached one to another, thus hierarchical structures (or 'trees') are built. Edition of a regular point of a shape changes only two segments of a curve connected to this point. When the pivot with it's handles is edited (moved, turned, etc.) all the changes are spread to every point of the shape. The pivot of selected shape is a center point of transformations. If "tree" mode is 'on', all the changes are spread to every point of shapes down the hierarchy tree.
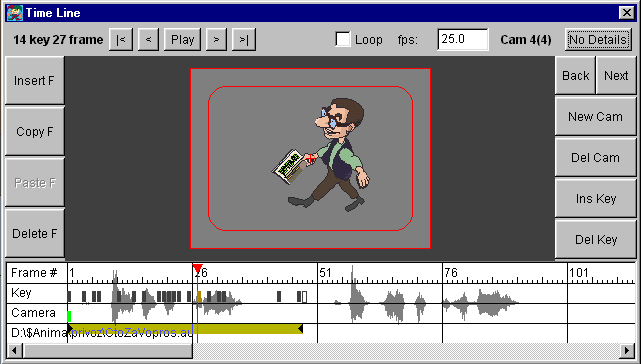
Character animation is represented as a set of key frames allocated on a timeline. Every key frame includes it's own copy of the shape set. Key frames can be copied, pasted, deleted or inserted between other key frames. To achieve desirable tempo of motion key frames can be shifted along the timeline.
Like the majority of animation programms, Tchiba interpolates the coordinates of shape points at intermediate frames over a time when rendering is executed.
Designer may keep an eye on the current results using fast rendered preview.
When project seems ready it can be used in two ways.
1. The project may be rendered into a .tga file sequence for use in following postproduction with well-known graphics animation programs. Compressed TARGA format was chosen because it supports 24-bit color model and can be imported by most of graphics programs. Alpha channel can be included or not. Size of finally rendered images may vary - usually it's useful to render a small size sequence for preview purpose and full size rendering for final production.
2. For Web design the project can be played directly by Tchiba Player Java applet. In this case, web designer has to allocate a .chiv file as well as applet archive file into necessary directory and add applet tag with several parameters to .html page. This way animation can be played with sound.
To provide different panoramas and zooms any necessary number of points of view can be created. Every point of view defined by coordinates of its center point and zoom parameter. Similarly to 3D programs these objects are called cameras. Cameras also can be animated. Set of cameras time keys is independent of animation key frames. Thus designer can render one scene from several points of view.
Designer may use scanned sketches/pictures of character or environment where the animation will occur for reference. The sketch can be imported as .jpg or .gif file and placed as a background in editing window.
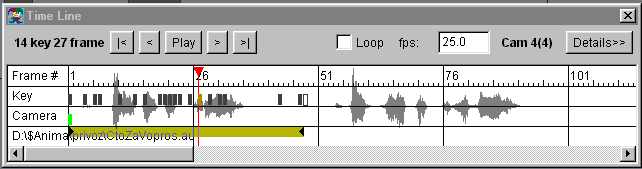
Frequently synchronization of motion with sound effects or music is very desirable. Tchiba Animator imports sound .au files. Thus designer is able not only to hear sound during preview, but watch the visual representation (waveform) of the sound on background of a timeline window. And key frames may be placed at timeline very precisely in accordance to sound effects or music.
It is real to animate vector graphics created in any other program. Tchiba Animator can import vector graphics from .ai files. Animator "understand" basic graphics and color commands of AI format. Every path from AI file is converted to a shape, and all shapes hierarchically connected to the first one.
|
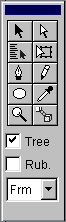
"Edit" button turns on Edit mode. In this mode you can select any point of selected shape and drag it.
When pivot point is edited: "Sel" button - shape selection. Shape can be selected by clicking near it's regular point or pivot. "Poly" - basic tool for shape creation. Click - to put corner point. Press and drag - to put smooth point, "+Ctrl" - to modify point to corner, "+Shift" - to modify point back to smooth. Right click - to finish shape. Pivot is allocated between first and last regular points. "Draw" - freehand drawing. Right click - to finish shape. Don't use this tool more then necessary. "Oval" - oval drawing. "+Shift" - roind. "+Ctrl" - from the center. "Copy", "Cut", "Paste" - usual manipulation with shapes. "Zoom" - select zoom for main window. Click or drag. "Attach" - build hierarchy tree. First (odd) click - to select a child shape, second (even) - a mother shape. Right click - finish. For points: "Ins." - insert point after selected one. "Del." - delete selected point. For mode: "Rubber" - turn on nonlinear shape edition for pivot point. Needs experiments to be familiar with it, but allows to achieve expression animation. |
|
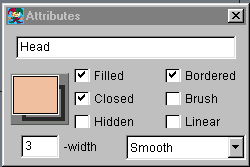
Don't forgot to write down a name for a shape, it would be useful later to select the shape by name - "Sel. By Name". Click on the color quad to change filling color, or on the border to change border color. Note: checkbox "Hidden" allows to control visibility of the shape from the current keyframe up to the next one. |
|
You can drug keyframes along time line on the "Key" stripe, as well cameras keys. If a sound AU file is loaded, you will see the audio represented here. |
|
Select camera key by clicking on timeline and edit it's parameters by dragging inside or outside red quad on the camera view in the center of Time Line Window. |
|
Keys |
Description |
| V | Select Shapes |
| A | Select/Edit Points |
| H | Select Shapes by List |
| E | Edit Shapes |
| P | New Shape using Bezier curve tool |
| N | New Shape using FreeHand tool |
| L | New Shape using Oval tool |
| I | EyeDropper, pick filling color to selected shapes |
| Z | Zoom Edit Window |
| J | Join shapes |
|
Keys |
Description |
| Ctrl+F1 | Address window |
| Ctrl+S | Save project file |
| Ctrl+O | Open project file |
| Ctrl+P | Print current image |
| Ctrl++ | Zoom In |
| Ctrl+- | Zoom Out |
| Left Arrow | Go to previous Key Frame |
| Home | Go to the first Key Frame |
| Right Arrow | Go to the next Key Frame |
| Up Arrow | Select a shape curriently selected shape is attached to |
| End | Go to the last Key Frame |
| Ctrl+Y | Turn off/on Dradt view mode |
| Ctrl+[ | Send Selected shape backward |
| Ctrl+Alt+[ | Send Selected shape to back |
| Ctrl+] | Send Selected shape forward |
| Ctrl+Alt+] | Send Selected shape to front |
| Enter | Make and view PreView |
| Ctrl+X | Cut Selected Shape |
| Ctrl+C | Copy Selected Shape |
| Ctrl+V | Paste Selection |
| Del | Delete Selected Shapes |
| Tab | Show/Hide Tools Windows |
| Ctrl+A | Select All Shapes |
| Ctrl+0 | Reset Zoom of Main Window |
| Ctrl+Z | Undo Shape Edit |
| Ctrl+Shift+Z | Redo Shape Edit |